Hybrid (AI + Rule based) Misbehavior Detection System (MDS) for Plexe
L. Ghiro, C. Pezzoni, M. Franceschini, R. Lo Cigno: “Physics Joins AI: A Real-Time Hybrid Misbehavior Detection Framework for Vehicular Networks” [Preprint]
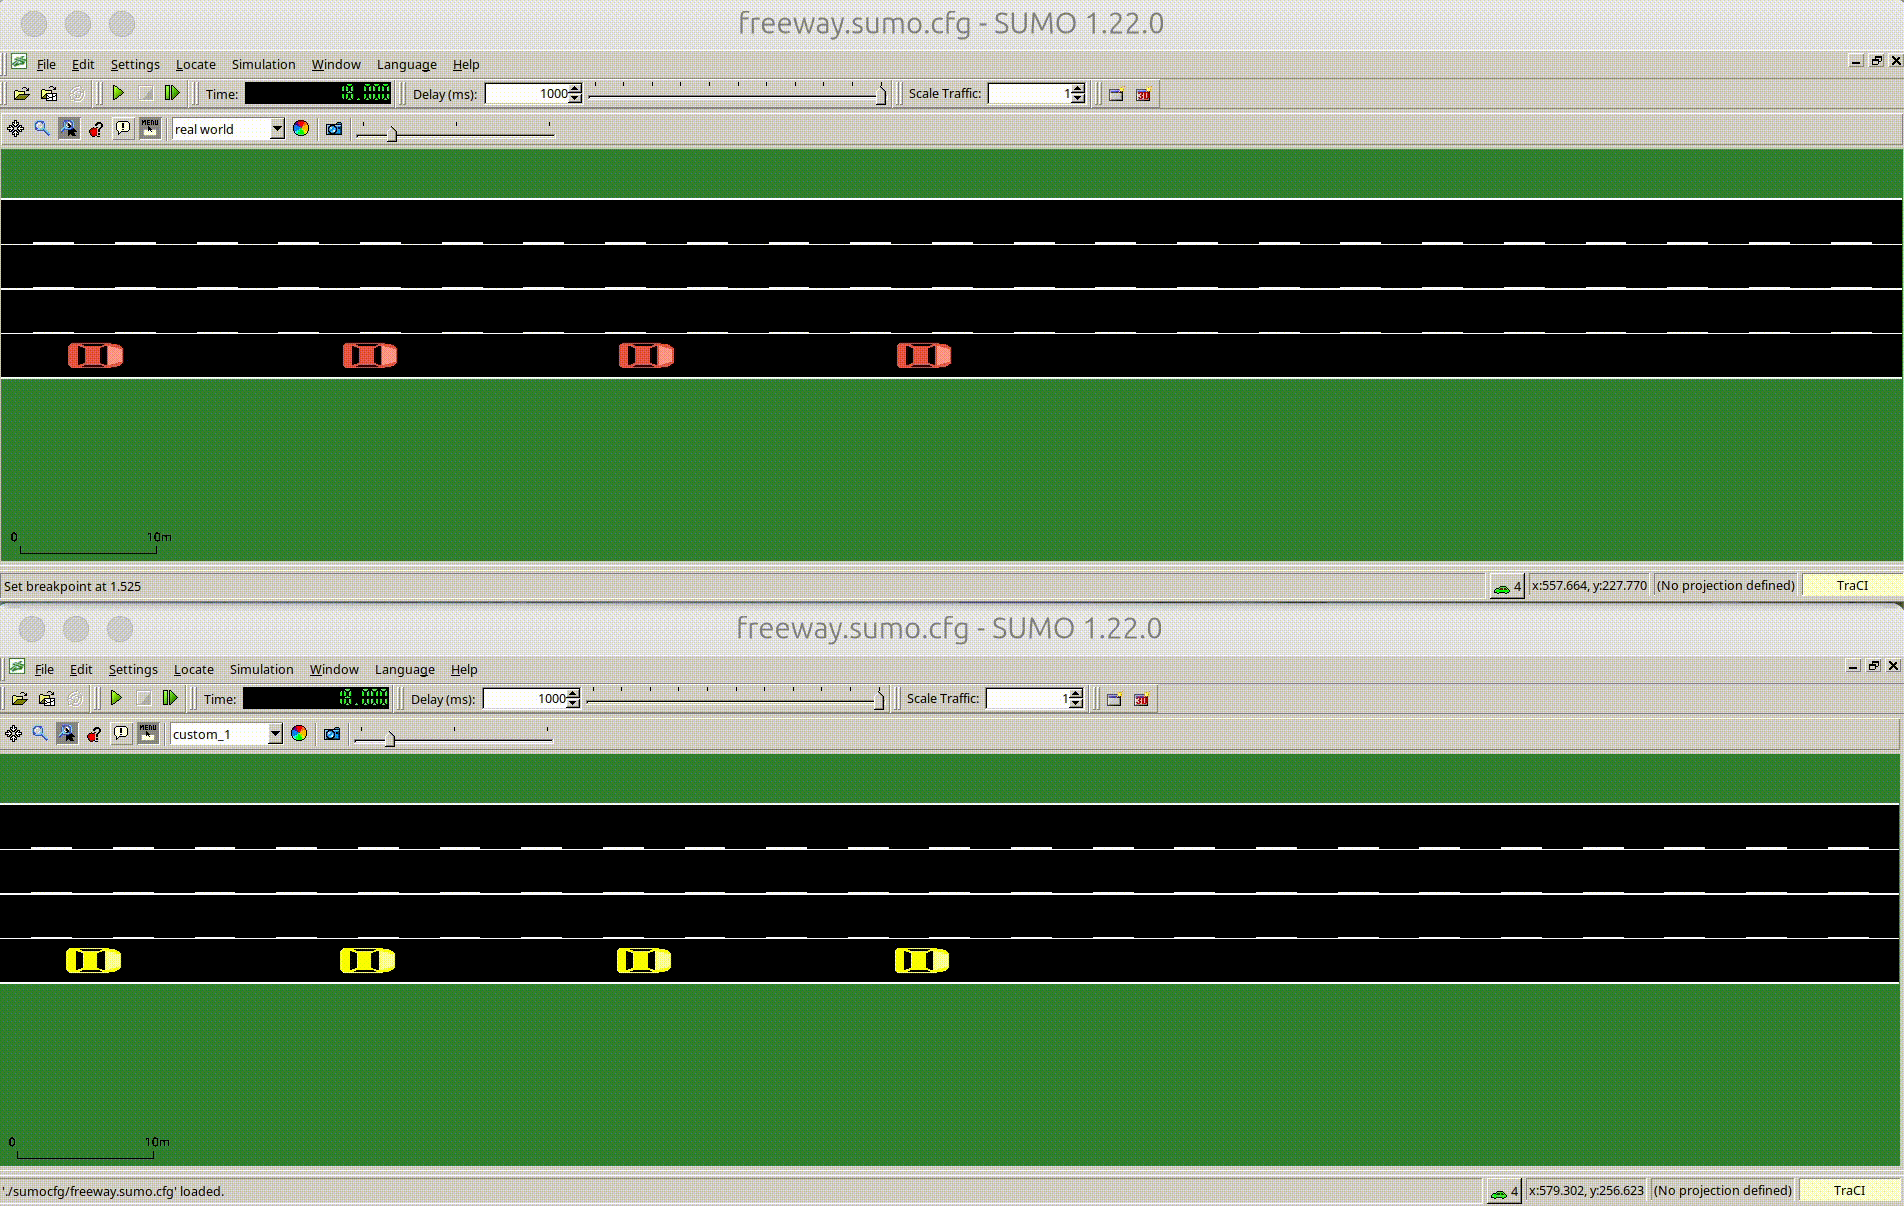 The same simulation of a platoon under attack: (above) without an MDS and (below) with an MDS. Without the MDS the platoons under attack crashes while, enabling the MDS, the platoons detects the attacks and reacts by opening safety gaps.
Table of contents
Introduction
The Hybrid Misbehavior Detection System combines two complementary approaches for evaluating messages exchanged between vehicles:
- an Artificial Intelligence based analysis;
- a physical coherence check of the message content.
The system is evaluated both offline on the VeReMi dataset and in run-time execution in a highway platooning scenario simulated with PLEXE.
Prerequisites
To use the AI model in PLEXE, Python must be linked with C++ using Pybind11.
1) Install Pybind11
Download the sources and CMake files as a Python package from PyPI using Pip.
pip install pybind11
2) Install additional dependencies
On Linux is important to install the python-dev or python3-dev packages as well as cmake.
sudo apt install python3-dev cmake
On macOS, the included python version works out of the box, but cmake must still be installed.
brew install cmake
3) Set Environment variables
Define the following variables in your
.bashrcor.zshrc(check first that they exist and that the path is the correct one):
# where is located pybind
export PYBIND="$HOME/.local/lib/python3.12/site-packages/pybind11"
# python include
export PY_INCLUDE="/usr/include/python3.12"
# python configuration
export PY_CONFIG="/usr/lib/python3.12/config-3.12-x86_64-linux-gnu"
Note: On macOS
pybind11is located in thesite-packagespath.- python include path can be found with:
python -c "from sysconfig import get_paths; print(get_paths()['include'])"- python configuration corresponds to the python library, which path can be found with:
python -c "import sysconfig; print(sysconfig.get_config_var('LIBDIR'))"
4) CODE to running the Simulations
To run the platooning simulations with the Hybrid MDS as defense against attacks or sensor malfunctions, the following versions of SUMO, VEINS, and PLEXE are required:
- sumo/comcomvsi2025-plexe3.2 - SUMO, extended to support front-gap computation using radar or beacon data for CACC algorithms;
- veins/comcomvsi2025 - VEINS, updated for compatibility with TraCI 22;
- plexe/comcomvsi2025-plexe3.2 - PLEXE, featuring the Hybrid MDS implementation.
5) OMNeT++ configuration
Once Pybind11 is installed, environment variables are set, and the correct versions of SUMO, VEINS, and PLEXE are linked, the OMNeT++ Simulator must be configured to use Pybind11.
In the IDE:
- Right click on the PLEXE folder
- Scroll down to Properties and click on it
- Navigate to C/C++ General -> Paths and Symbols
- Under Includes -> GNU C++, click Add, enter
${env_var:PYBIND}/includeand tick Add to all configurations and Add to all languages, then click Ok- Repeat for
${env_var:PY_INCLUDE}and${env_var:PY_CONFIG}- In the Libraries section click Add, enter
python3.12, tick Add to all configurations and Add to all languages, then click Ok- In the Library Paths section, click Add, enter
/usr/lib/python3.12/config-3.12-x86_64-linux-gnu, tick Add to all configurations and Add to all languages, then click Ok- Repeat adding
python3.12and/usr/lib/x86_64-linux-gnu- Finally, click Apply and Close
Note: On macOS, after step 6 follow the steps below:
- In the Library Paths section, click Add, enter
python3.12, tick Add to all configurations and Add to all languages, then click Ok- Repeat adding the path associated with the environment varible
$PY_CONFIG- After this, in the OMNeT++ -> Makemake section, select the
plexe/srcfolder, click Options.. on the right under Makemake section. In the Link section, click More» and in Additional libraries to link with: addpython3.12, then click Ok- Finally, click Apply and Close
Preprocessing of VeReMi Data
VeReMi datased is shipped as a collection of Json files, so in the preprocessing step it is necessary to create compact parquet files representing the whole dataset. Each VeReMi message must be labeled by comparing the logs (files with messages received by each vehicle, including incorrect data if the sender was misbehaving) with the ground truth (files with all the correct and real data send by each vehicle). Then the messages must be sorted, aligned and put-in-sequences to be used as input for neural network and rule based MDS.
Convert all Json to parquet
./preprocessJsonFolder.sh <folder> <num_cores>
e.g.
./preprocessJsonFolder.sh ../Data 20
This bash script detects all JSON files representing log and groundTruth messages of the VeReMi dataset and converts them to a more compact (10x memory saving) format (parquet) to ease next steps of labeling data and the further creation of training sequences.
Merge parquet
Once the JSON files have been converted to parquet, all traceJSON and traceGroundTruthJSON files for each attack must be merged into two files: merged_traceJSON.parquet and merged_traceGroundTruth.parquet. To perform the merge, run the merge_parquet_per_attack.sh script as follows:
# ./merge_parquet_per_attack.sh <folder/containig/parquet/files> <num_cores>
./merge_parquet_per_attack.sh ../Data $(nproc)
This will generate, inside each attack folder, a merged_traceJSON.parquet file and a merged_traceGroundTruth.parquet file. These files will contain, respectively, all the traceJSON and traceGroundTruthJSON parquet files merged for that specific attack.
Label data
Once merged JSON files have been created, logged messages can be checked against their ground-truth and consequently labeled. To do so select one folder containg one merged-ground-truth file and launch the bash script label_all_veremi_folders.sh like in this example:
# ./label_all_veremi_folders.sh <folder/containing/merged/files> <num_cores>
./label_all_veremi_folders.sh ../Data 20
This will generate in the selected folder a {attackName}_labeledSummary.parquet that is the list of all messages logged by each receiver labeled if they were detected as genuine or malicious during the labeling process.
Preparing sequences
The {attackName}_labeledSummary.parquet files should be further processed/splitted in order to build the input vectors used for feeding the neural network.
To do so:
./sequence_all_veremi_folders.sh <top/folder/with/{attackName}_labeledSummary.parquet> <WINDOW-WIDTH> <WINDOW-STYLE> <labelingPolicy> <NUM_CORES>
e.g.
./sequence_all_veremi_folders.sh ../Data 5 jumping last 20
This will generate, inside each attack folder, two parquet files: xsequences_ww_<WINDOW-WIDTH>_ws_<WINDOW-STYLE>_policy_<labelingPolicy>.parquet and ysequences_ww_<WINDOW-WIDTH>_ws_<WINDOW-STYLE>_policy_<labelingPolicy>.parquet.
Merge sequences
Once xsequences*.parquet and ysequences*.parquet files have been created inside each attack folder, all the xsequences*.parquet files and all the ysequences*.parquet files must be merged in two files.
To do so run the script merge_all_sequences.sh like in this example:
# ./merge_all_sequences.sh <path/to/(x|y)sequences/files>
./merge_all_sequences.sh "../Data/*/xsequences_ww_<WINDOW-WIDTH>_ws_<WINDOW-STYLE>_policy_<labelingPolicy>.parquet"
This will generate, in the folder you launched the script, two files: ALL_xsequences_ww_<WINDOW-WIDTH>_ws_<WINDOW-STYLE>_policy_<labelingPolicy>.parquet and ALL_ysequences_ww_<WINDOW-WIDTH>_ws_<WINDOW-STYLE>_policy_<labelingPolicy>.parquet.
Training AI model
Once produced the xsequences and ysequences, to train the model enter the folder examples/misbehaviourDetection/NNtraining/training and digit
python newtrain.py --labels ../preprocessing/ALL_ysequences_ww_<WINDOW-WIDTH>_ws_<WINDOW-STYLE>_policy_<labelingPolicy>.parquet \
  --data ../preprocessing/ALL_xsequences_ww_<WINDOW-WIDTH>_ws_<WINDOW-STYLE>_policy_<labelingPolicy>.parquet \
  --num_steps <WINDOW-WIDTH - 1> \
  --num_features 6 \
  --class_weight_strategy <classWeightStrategy>
This will generate, in the folder you launched the script, three files: model.keras, standard_scaler.pkl and plottable.pkl. The last one is useful to plot metrics and learning rate with plotter.py script passing this file as argument. The first two, instead, are used for the following linking step.
Linking
Now, in examples/misbehaviourDetection folder, modify the omnetpp.ini file to correctly link the model and the StandardScaler produced
*.node[*].appl.model_path = "./NNtraining/training/model.keras"
*.node[*].appl.scaler_path = "./NNtraining/training/standard_scaler.pkl"
*.node[*].appl.window_style = "sliding" // or "jumping"
Evaluating AI and RULE MDS offline
The Hybrid MDS is first evaluated offline on the VeReMi dataset by running both the AI-based and the rule-based methods on the same sequence of messages in the dataset. To do so, run:
python pevalmds_offline.py -j <NUM_PARALLEL_JOBS> \
    --dataFraction <DATA_FRACTION> \
    --model $MISB/NNtraining/training/model.keras \
    --scaler $MISB/NNtraining/training/scaler.pkl \
    --MCdropRep <MC_DROPREP> \
    --art
e.g.
python pevalmds_offline.py -j 8 \
    --dataFraction 0.1 \
    --model $MISB/NNtraining/training/lstmModel.keras \
    --scaler $MISB/NNtraining/training/stdScaler.pkl \
    --MCdropRep 10 \
    --art
Where:
-
--dataFractionrepresents the fraction of the dataset to be evaluated; -
--MCdropRepspecifies the number of Monte Carlo Dropout forward passes; -
--artis an optional flag to enable an additional rule-based check during the evaluation.
The output of pevalmds_offline.py script is a parquet file saved as mds_datafr_<DATA_FRACTION*100>_MCdropRep_<MC_DROPREP>_MCdropCU10_wART.parquet (with wART in the filename if the --art flag was specified).
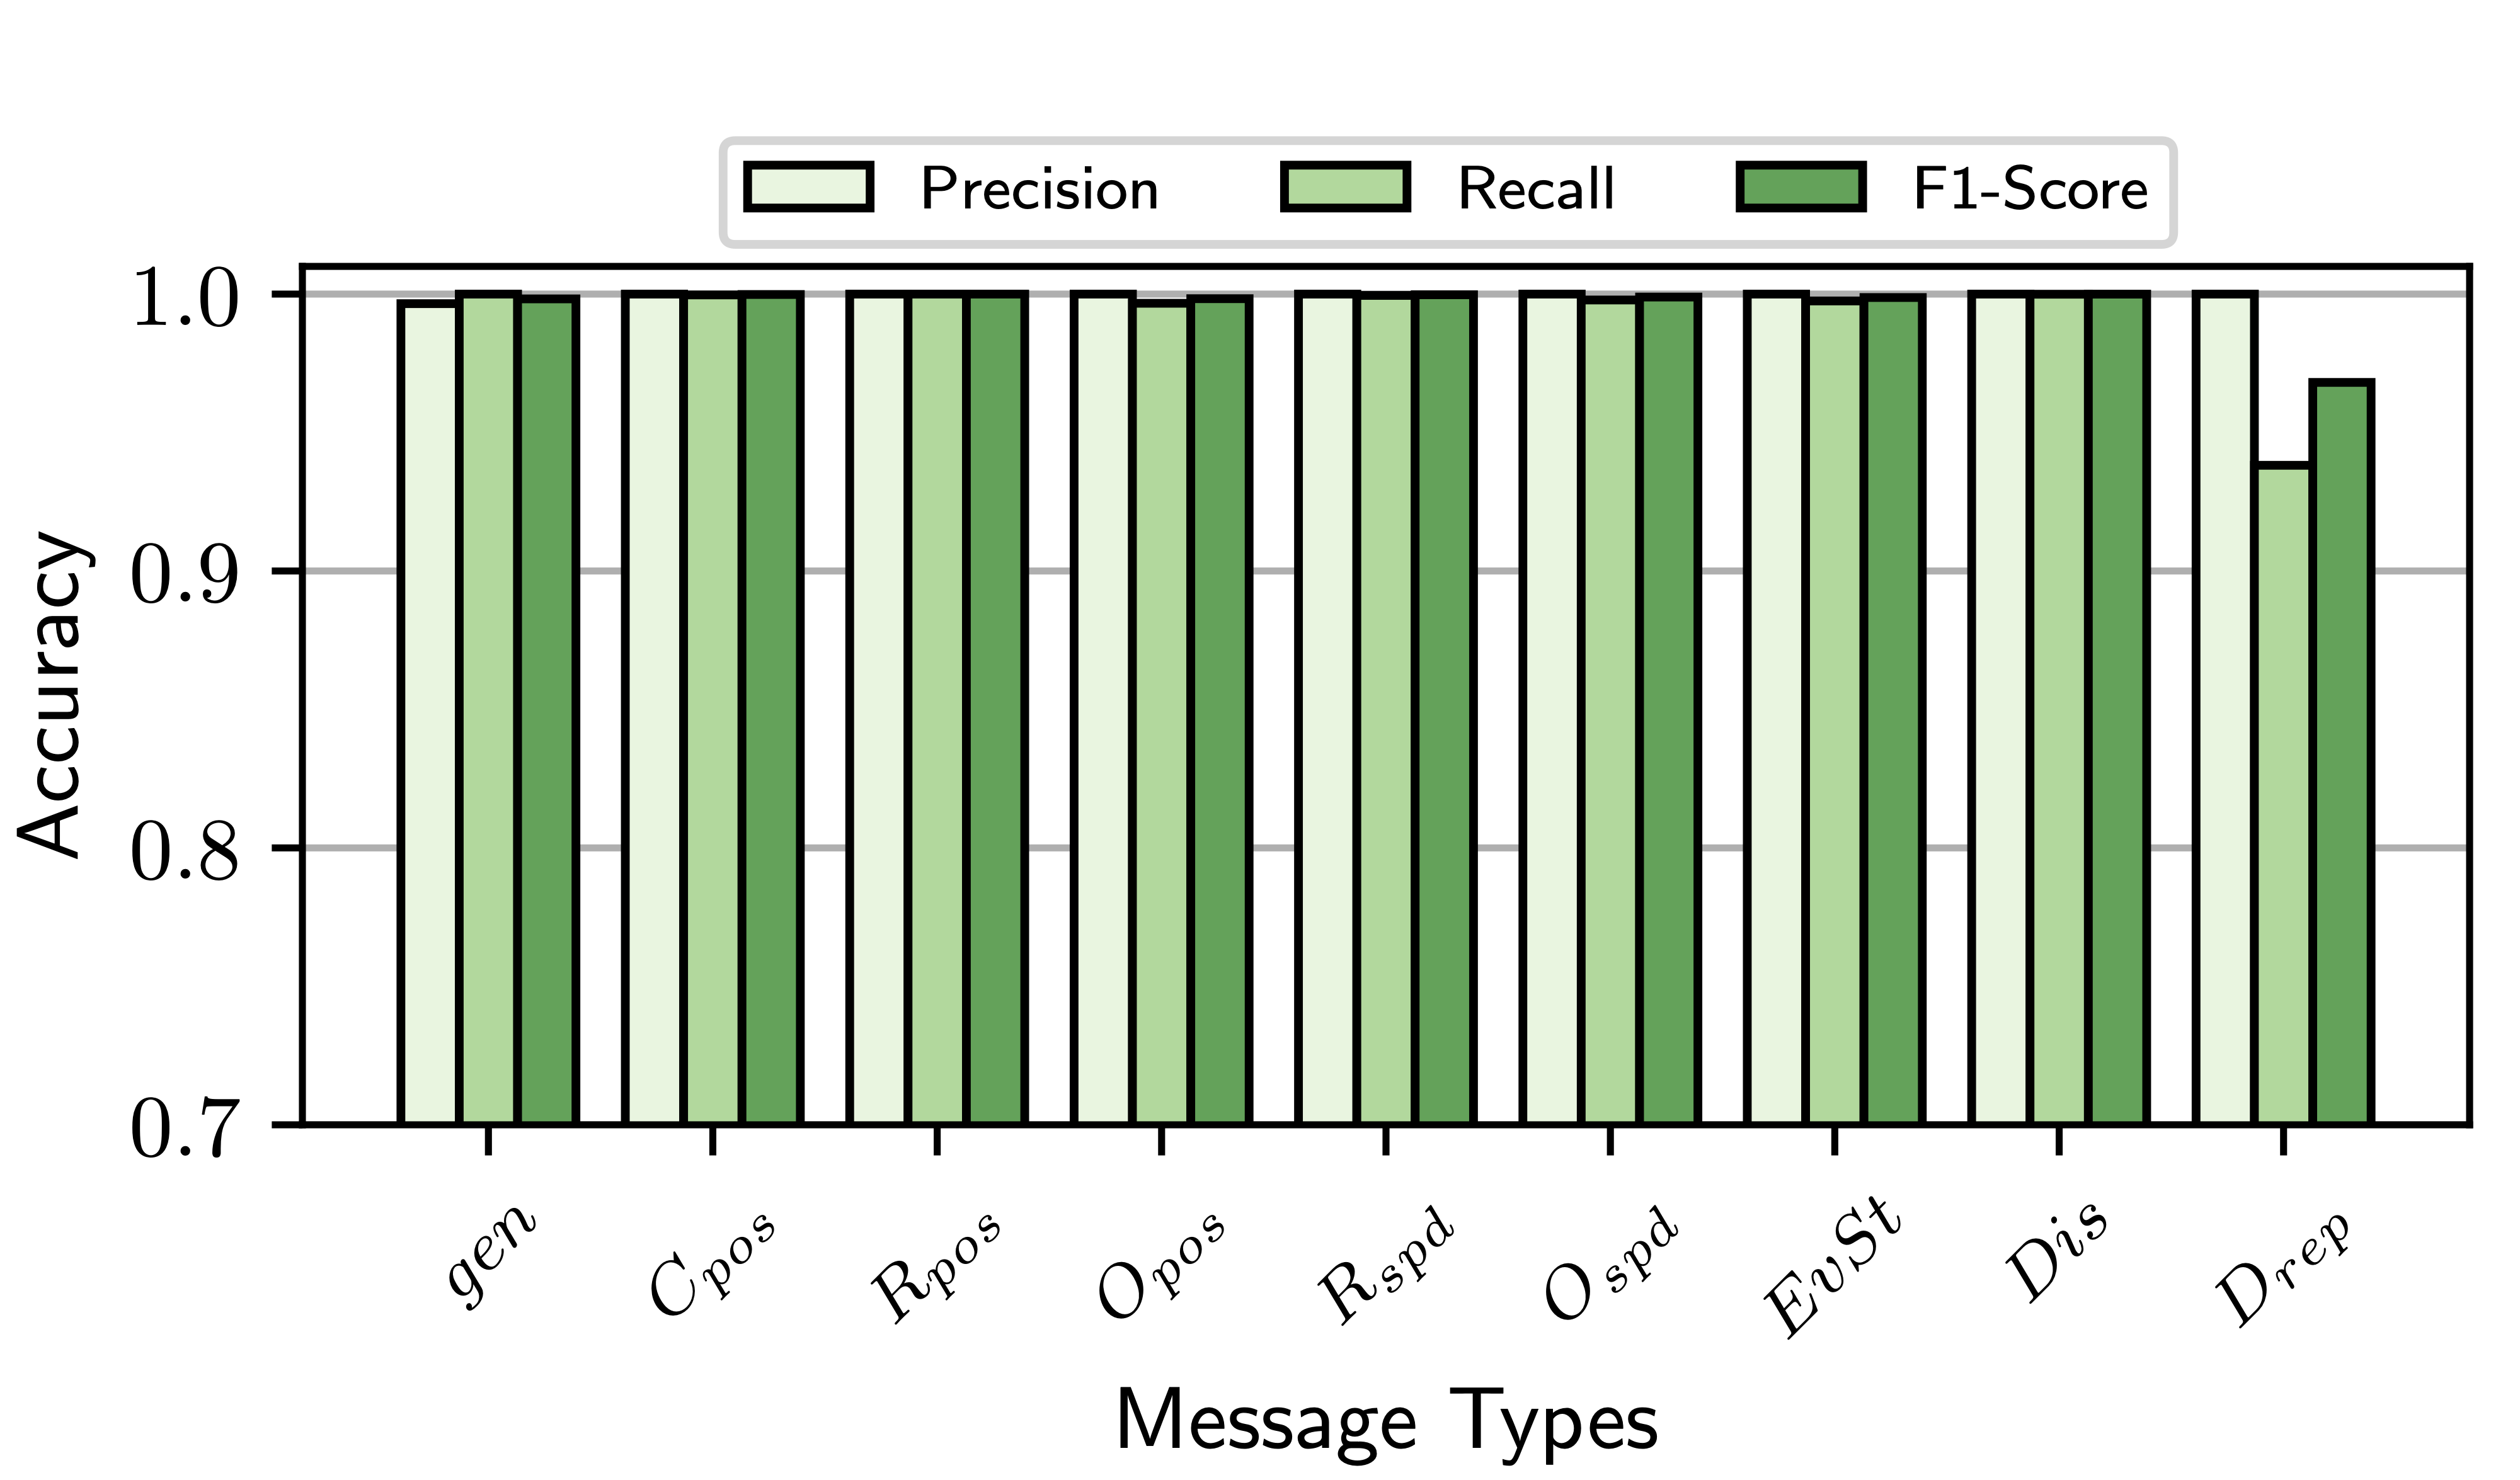
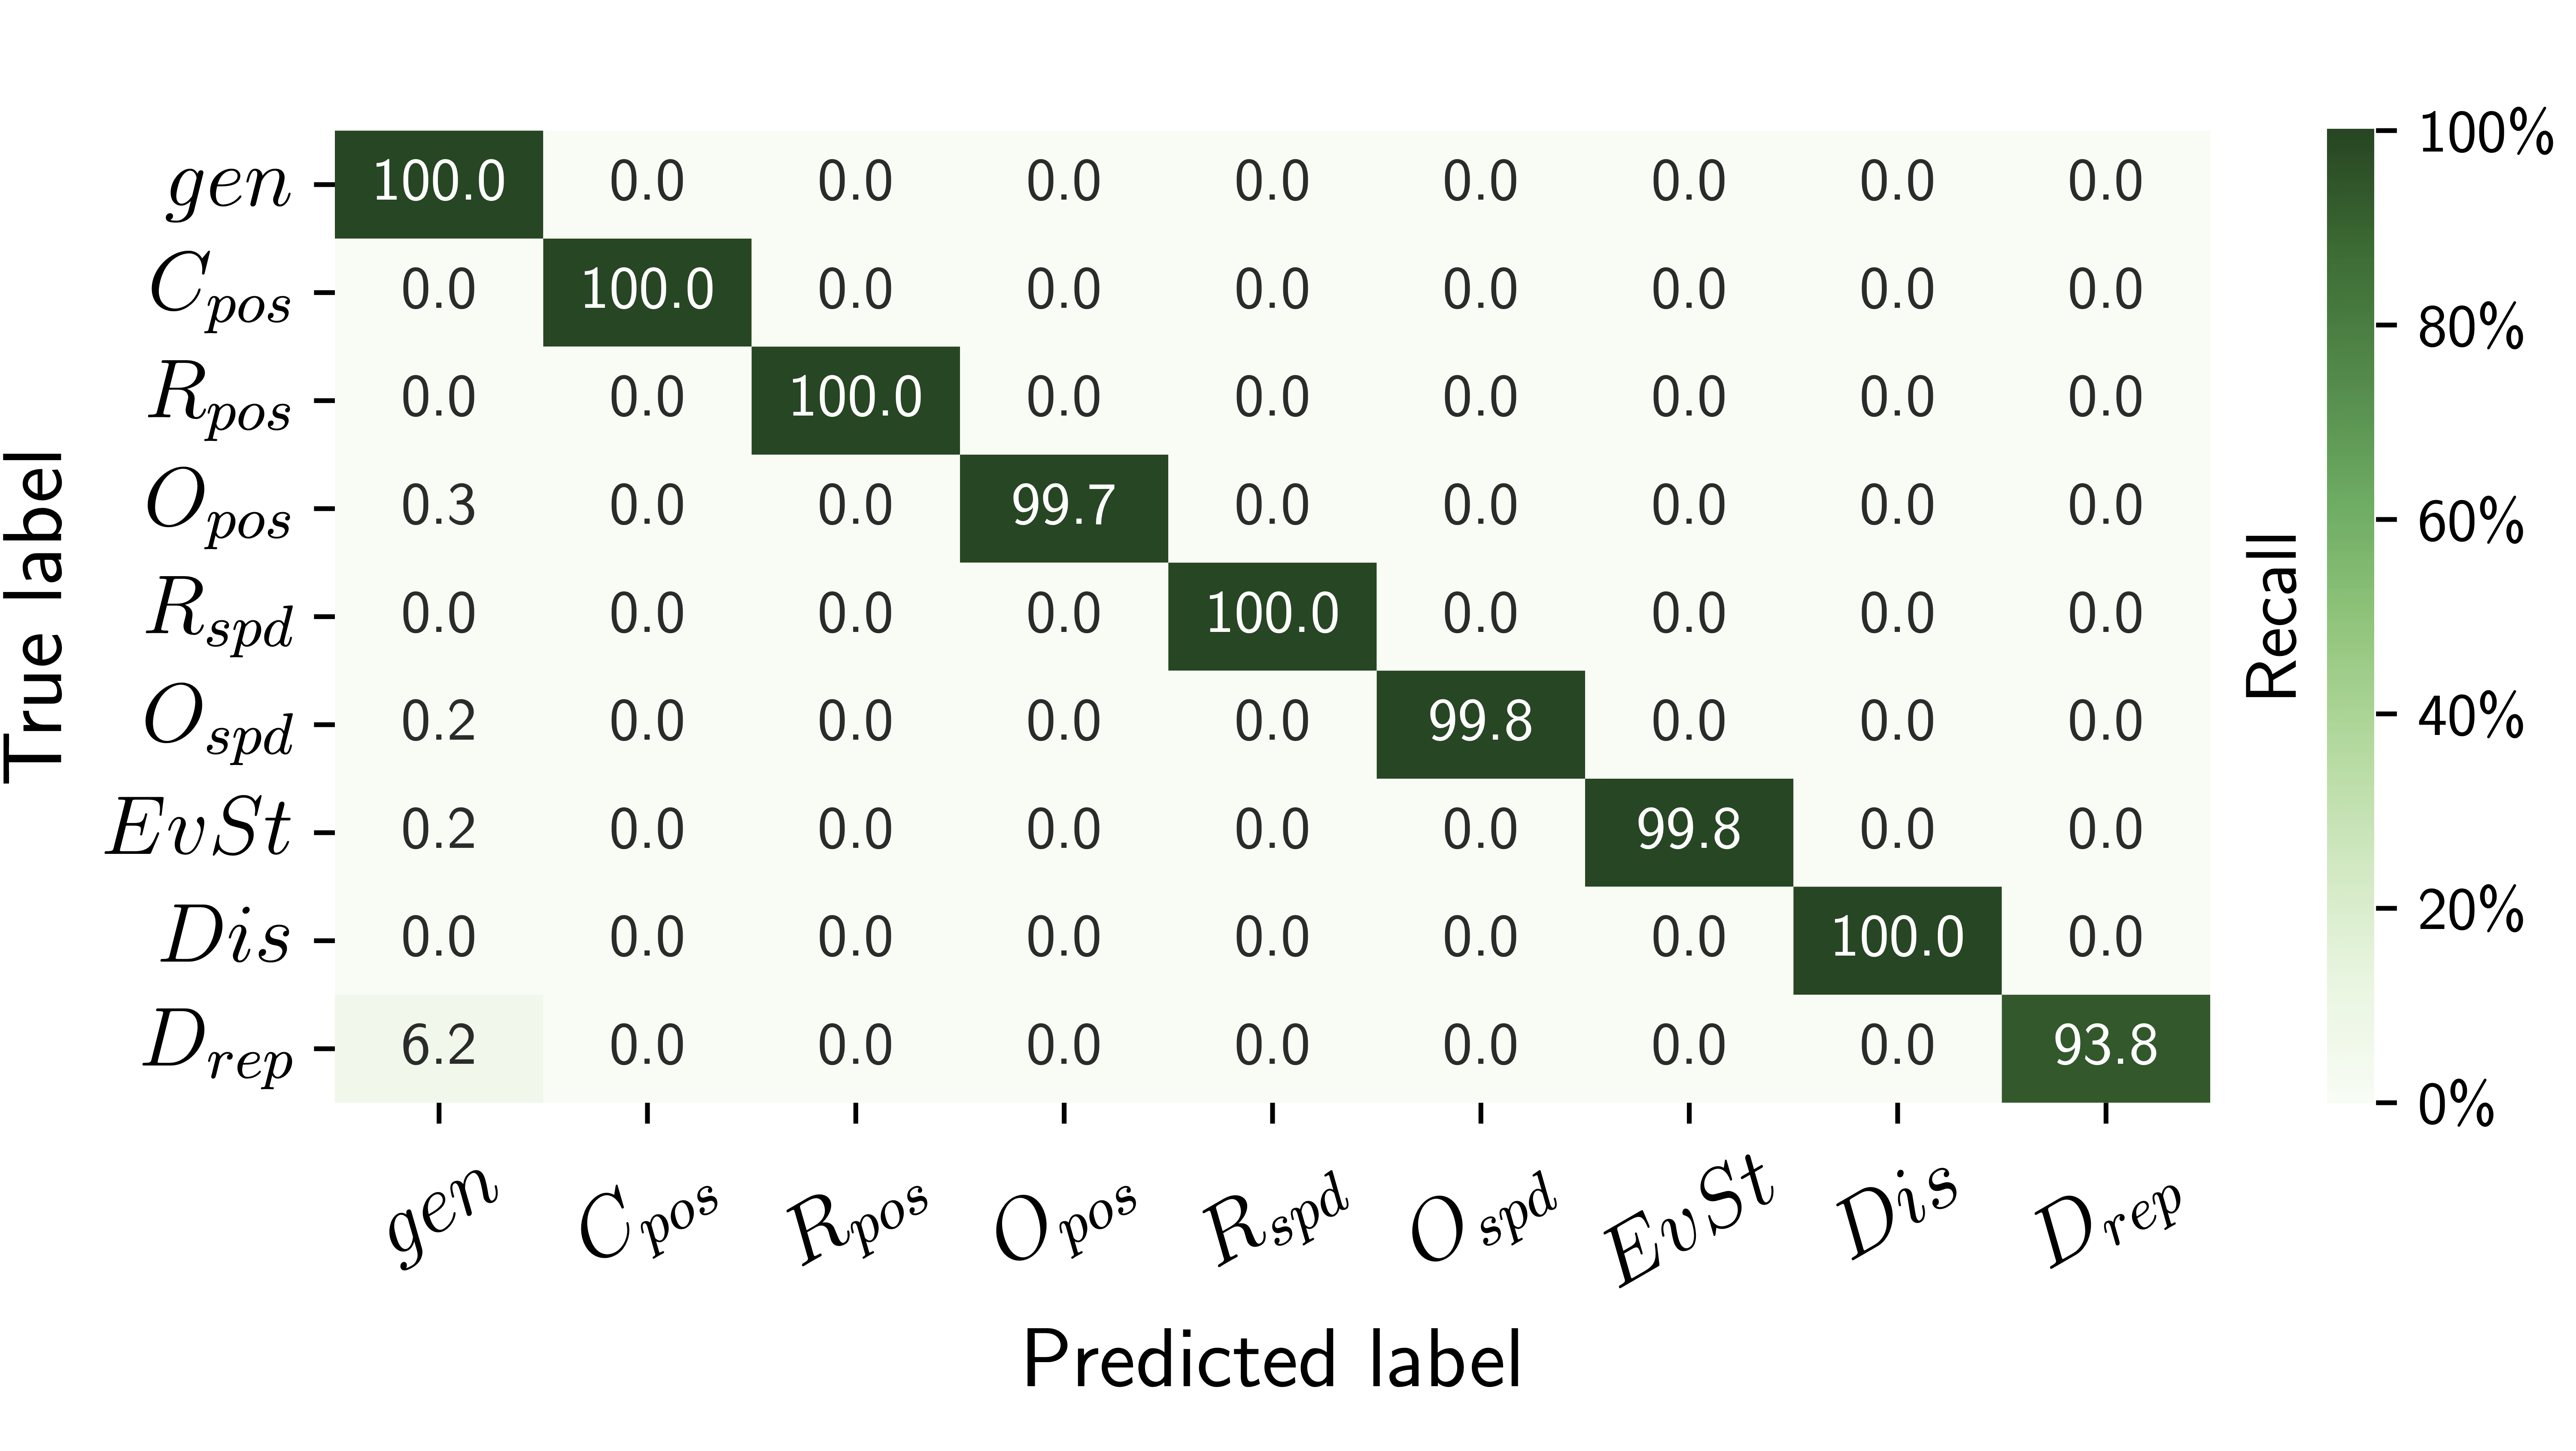
This file is passed as argument of the offlineplotter.py script to produce the accuracy bar chart (Precision, Recall and F1-Score metrics) and the confusion matrix:
python offlineplotter.py mds_datafr_<DATA_FRACTION*100>_MCdropRep_<MC_DROPREP>_MCdropCU10_wART.parquet
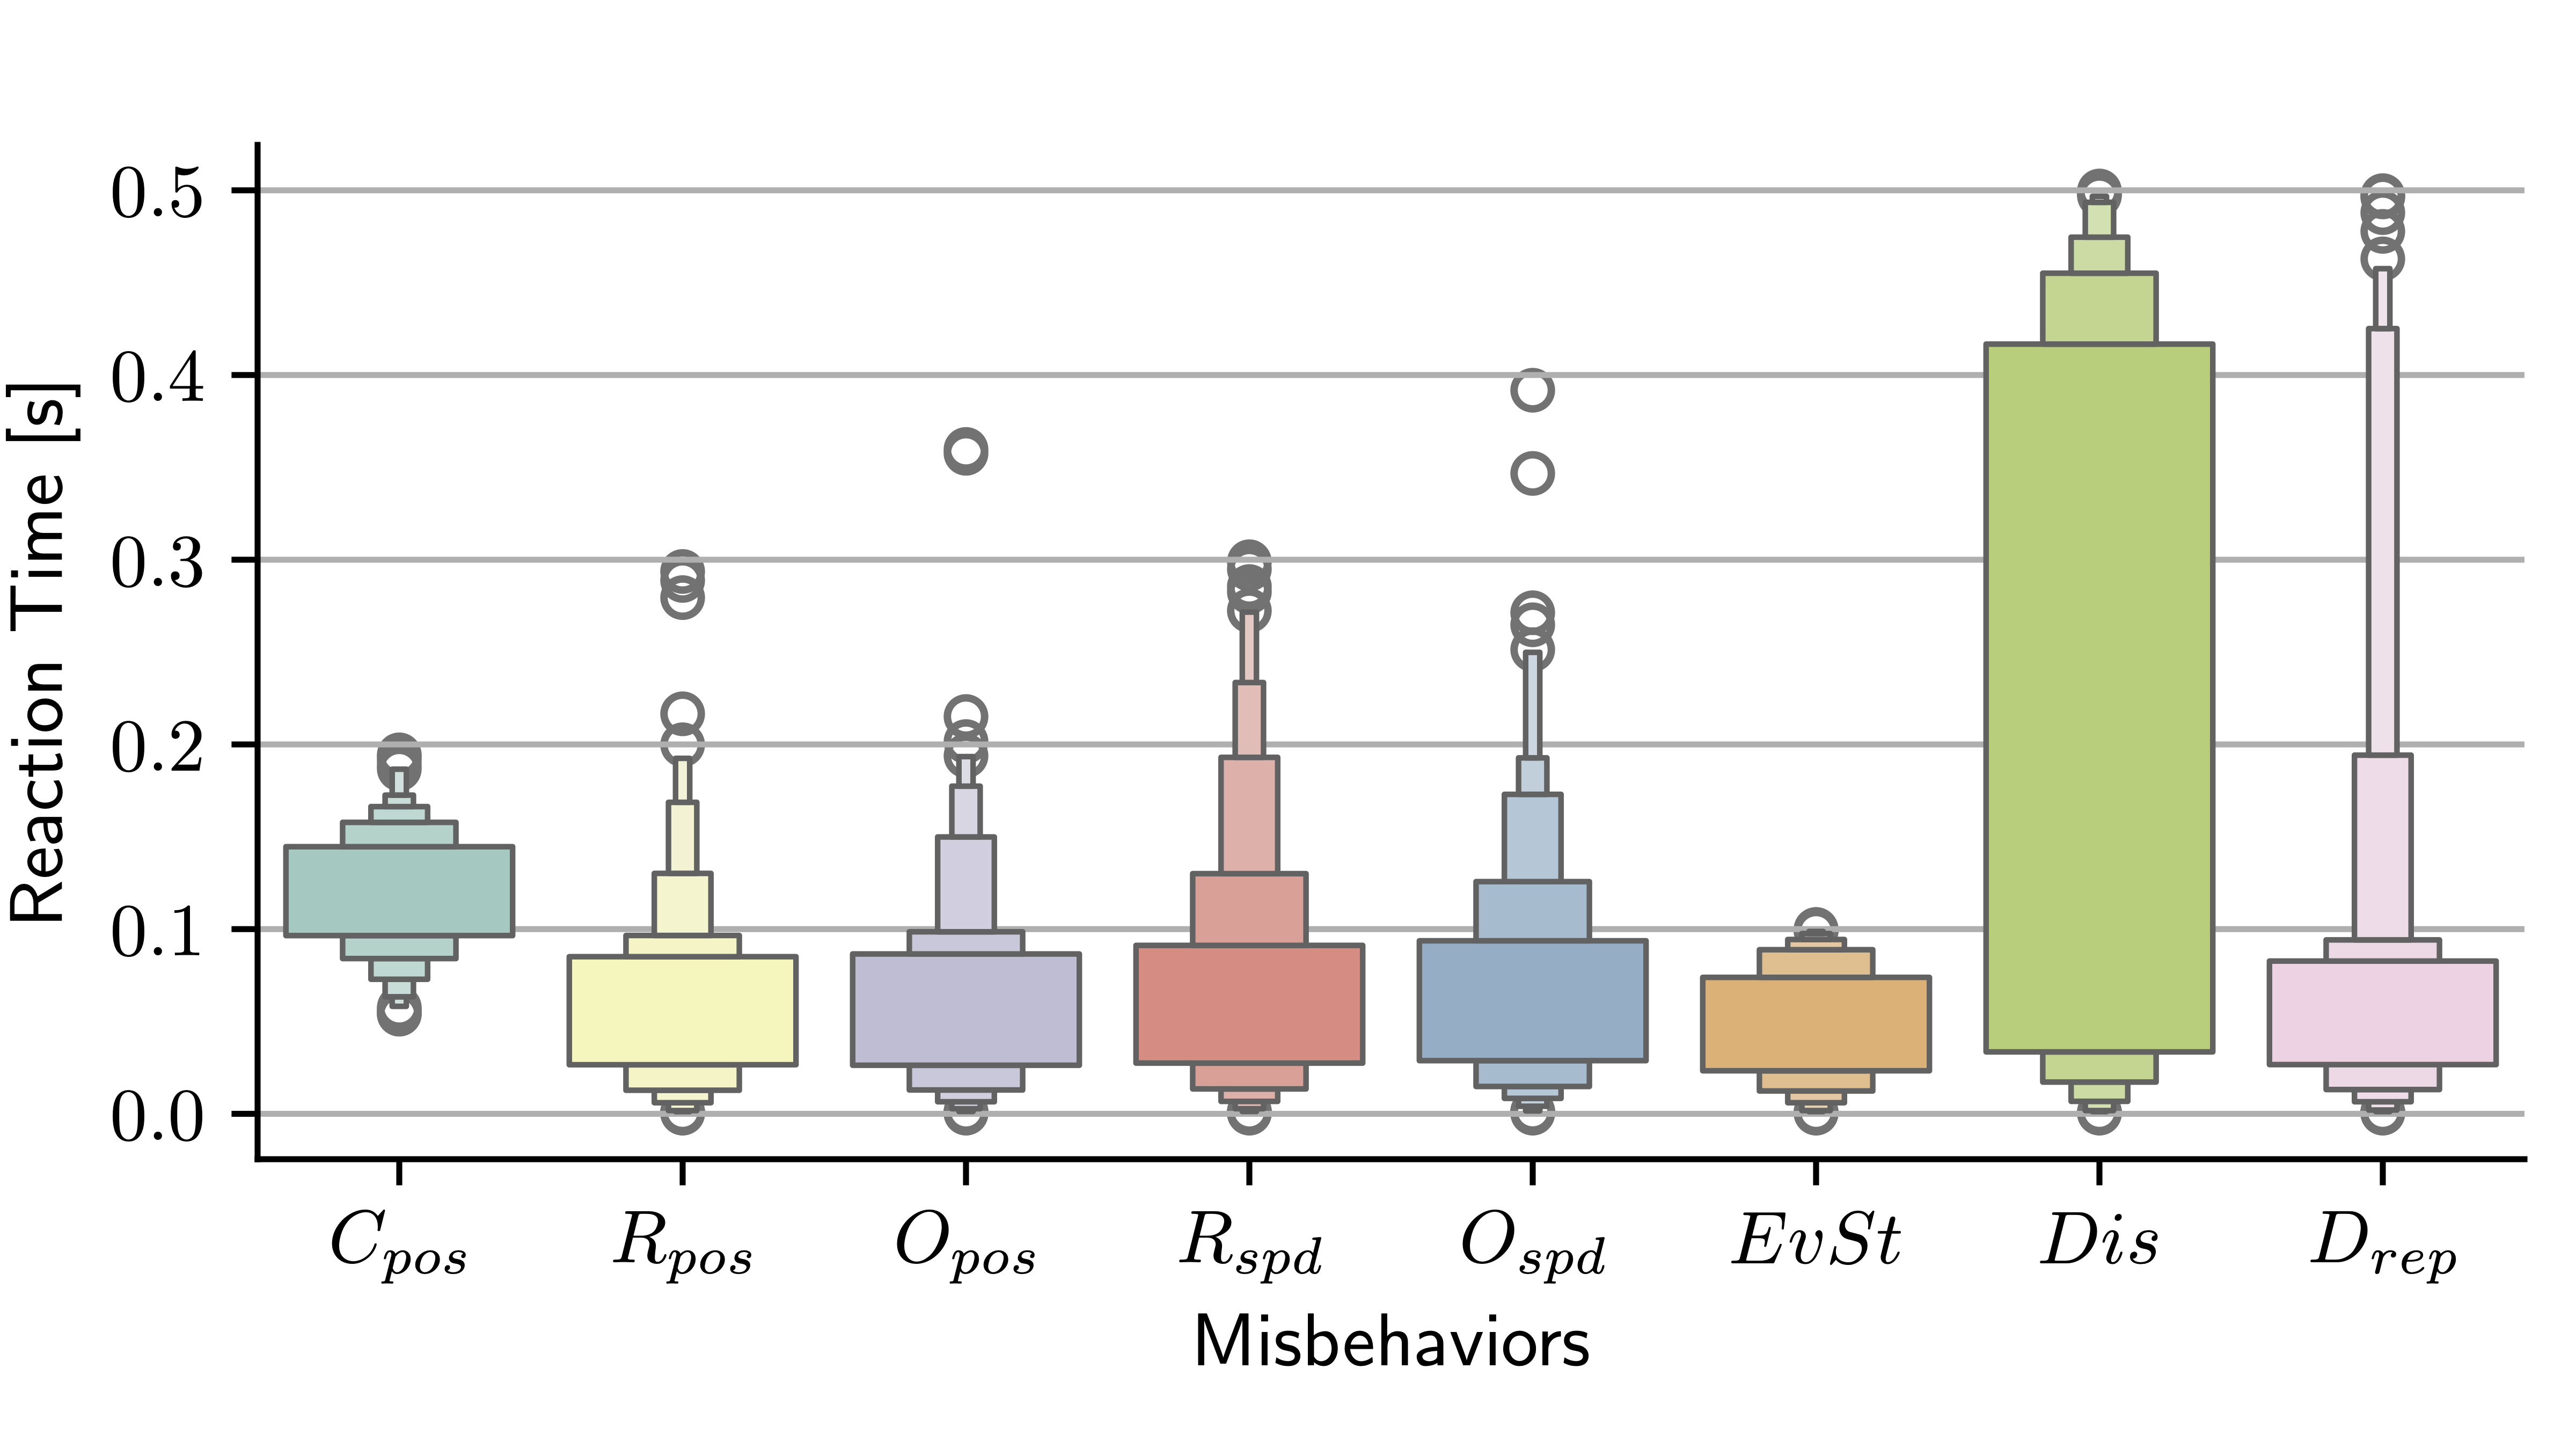
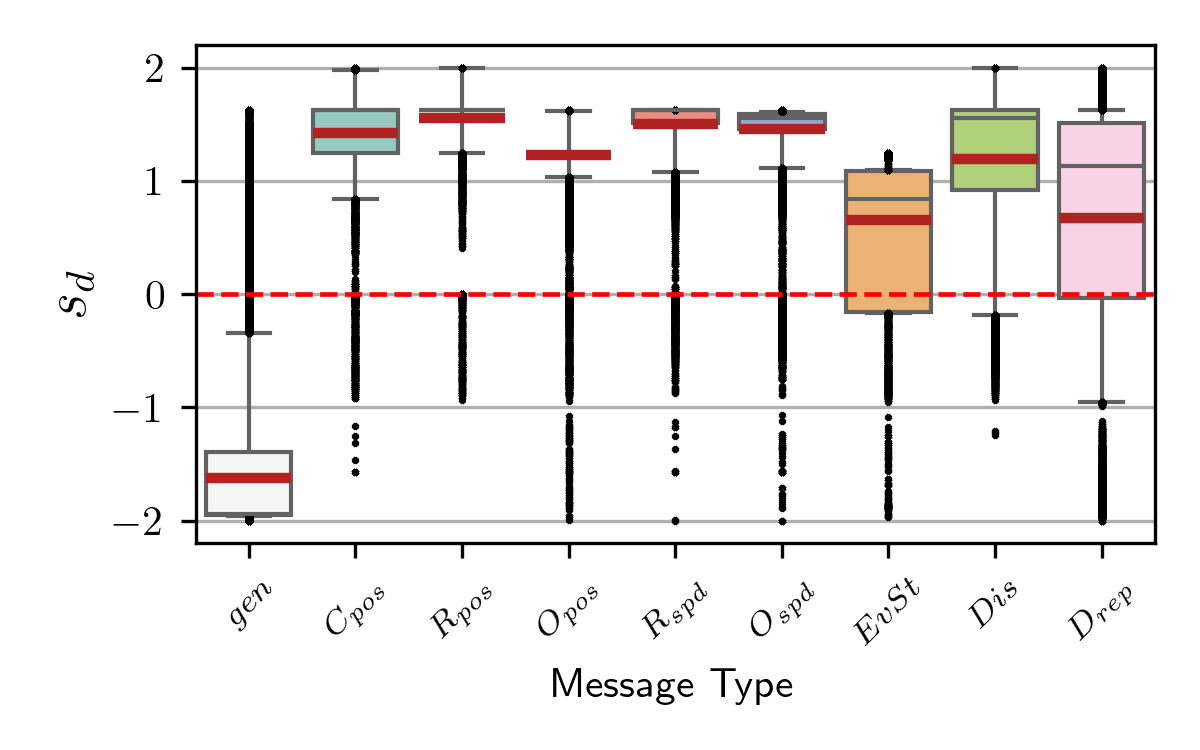
The file is also passed as argument of the score_distrib.py script to produce the boxplots of the decider score for all message types:
python score_distrib.py mds_datafr_<DATA_FRACTION*100>_MCdropRep_<MC_DROPREP>_MCdropCU10_wART.parquet
Runtime Evaluation with PLEXE
Then, the Hybrid MDS is evaluated in run-time simulations:
cd $PLEXE_DIR/examples/misbehaviourDetection
./run -u Cmdenv -c <CONFIGURATION> -r <SIMULATION_RUN_NUMBER>
Where <CONFIGURATION> can be:
-
Misbehavior4- platoon in isolation; -
TrafficAround- platoon surrounded by background traffic, where the misbehaving vehicle belongs to the background traffic; -
TrafficAroundPlatoonMisb- platoon with background traffic, where the misbehaving vehicle belongs to the platoon.
The Main Parameters that characterize vehicles and communications in the simulation experiments are the following:
| Parameter | Value | |
|---|---|---|
| Scenario | Road Type | 3-Lane Highway |
| Duration | 120 s | |
| Misb. Start Time | Uniform[15,30]s | |
| Default CACC | PLOEG | |
| PLOEG Headway | 0.5 s | |
| Autonomous Controller | ACC | |
| ACC Headway | 1.2 s | |
| Beaconing Frequency | 10 Hz | |
| Platoon Size | 4 | |
| Leader Speed | 100 km/h | |
| Speed Oscillation Amplitude & Freq | 5 km/h, 0.1 Hz | |
| Background vehicles when present | 9 | |
| Repetitions per Experiment | 100 | |
| Communication | L2-technology | dual radio 802.11p |
| Tx power | 100 mW | |
| Broadcast MCS | 3 Mbit/s | |
| Unicast MCS | 12 Mbit/s | |
| Rx sensitivity | -94 dBm |
Once run all the simulations of a specific configuration, to evaluate the run-time performances of the Hybrid MDS, the collision rate and the reaction time are computed.
In the $PLEXE_DIR/examples/misbehaviourDetection/analysis folder run the following script:
findCrashedRuns.py --glob "../results/*collision.xml" -w
This will generate, in the current folder, the cr_pl<PLATOON_SIZE>_<CONFIGURATION>.csv file, which is passed as argument to the script to compute the collision rate:
python compareCollisionRate.py cr_pl<PLATOON_SIZE>_<CONFIGURATION>.csv

Then, always in the $PLEXE_DIR/examples/misbehaviourDetection/analysis folder run the following bash script:
./extractReactionTimes.sh $(nproc) <PLATOON_SIZE> <DEFENSE_TYPE> > ../results/rt_pl<PLATOON_SIZE>_<CONFIGURATION>.csv
This will generate, in the $PLEXE_DIR/examples/misbehaviourDetection/results folder, the rt_pl<PLATOON_SIZE>_<CONFIGURATION>.csv file, which is passed as argument to the script to compute the reaction time:
python reacTimes.py rt_pl<PLATOON_SIZE>_<CONFIGURATION>.csv